Showing posts with label Food Photography Basics For Food Bloggers. Show all posts

How to build a Light box for Food Photography

After many months of thinking about it, I finally did it - A light box for food photography! It really is as easy as they say in many sites and blogs around but before you jump ahead, I would ask you to consider a few things, based on my experience.

- Do you really need one? Although a light box gives you the flexibility to click pictures of your food whenever you'd like, nothing can beat natural light when it comes to food photography. Let me repeat that - nothing. A lot of professional food photographers may go for fancy studio equipment but the beauty of food blogging from our homes and kitchens is, this is what we make for our family meals, we are sharing our recipes and what we cook on a day-to-day basis. I wouldn't compare that to commercial food photography any day.

Another thing to consider is, do you usually plan before you cook for the blog or do you cook something and then decide you want to blog about it. If you find yourself doing more of the latter, then a light box may be a good idea because half the time I think that way, its night time on a week day when I am at work all day.

- Do you have the space for it? You can always dismantle your light box and set it up only when you need it but trust me, that won't happen often. So you will end up building it but hardly ever using it if you don't have a fixed spot for it in your house. We recently moved into a three bedroom apartment and I am using the third bedroom as my studio. The wardrobe is where I keep my photography accessories and the light box sits to one side of the room. I don't intend to move it from there or dismantle it.

So here it is, my very own light box!
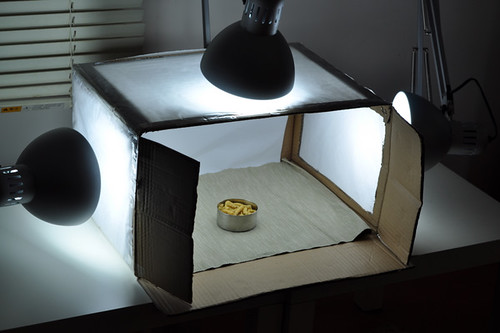
lightbox pic

I pretty much followed the instructions on RV's site. The few differences I made are:

- I used a smaller box
- I used tracing paper instead of fabric to cover the slots through which light enters the box
- I used 18W daylight bulbs that give a 100W output

A few initial shots with varying light input - both Straight Out Of Camera (SOOC) and edited.

lightbox pic

This is the first picture I took, without bothering with a background sweep or anything. I was super eager to see the results. Remember, this was taken in the night, at around 8:00pm. Taken with one light - SOOC.

lightbox pic

Another macro shot, taken with one light - SOOC.

green mor kozhambu

The first food shot, taken with one overhead lamp - SOOC except for watermark and straightening. I didn't have the other two lights set up when I took this so I had to depend on editing to make it look better.

5310998967_dfae8bb4c5_z

Same picture, after editing.

lightbox pic

Enter three lamps - first food picture with all three lamps as shown in the light box picture above. No editing done - SOOC.

DSC_0746-ed

One of my favourite light box pictures to date (I haven't taken that many yet, I always turn to natural light if I can help it). This is a very lightly edited picture taken in the light box, again, in the night.

I have taken a few more and recipes are coming up soon for this dishes. Going forward, I will clearly mark the picture setting when posting pictures because I expect a good mix of both kinds of pictures in future posts.

Other sites you can refer for building your own light box:
Digital Photography School
Jugalbandi

How to Choose an SLR Camera

Actually, this post should rightly be titled how I chose my SLR. I have been getting tons of questions from you guys about my new camera - a Nikon D90 - the type of lens I got, price, where I bought it and most importantly, how I came to the decision.


It was easy, really.

Step 1- Canon vs Nikon

When I started blogging, I bought a very very basic Nikon point and shoot (P&S) camera - the Nikon L10. It was 5 megapixels and had a 3x optical zoom (although I hear these numbers actually mean nothing), it still gave me good pictures. So my mind went and made itself up thinking "Nikon rocks!".

Then I became a Canon girl. It wasn't a conscious decision but I wanted a high-end P&S that will see me through until I saved up for an SLR. I decided on the Canon SX10 IS. I instantly felt the difference between that and the basic model. The pictures suddenly started looking better and it was great.

But.

I wanted an SLR and I wanted a Nikon one. Somehow it was etched in my mind that Nikon is better than Canon so I was stuck on that decision. That's the first decision you will need to make. I honestly don't think one is a better brand than the other, for most of the Nikon models out there, there's usually a Canon counterpart.

Step 2 - Price

Decide on your budget. You will most likely go over it by a little but have a rough range that you wish to spend on your SLR. This will directly influence the specs of your camera, especially the lens. My budget was about 1800 SGD / ~1400 USD.

Step 3 - Lens

There are a few ways to go about this. You can decide to invest in a cheap body and better lens. Or, you can go for a decent body and decent lens (both mid-range). Going for an expensive body and basic lens is not a good idea when you are starting out, I don't need to tell you that.

Most SLRs come with a kit lens. The D90 which I got comes with an 18-105mm Nikkor lens. Its important to understand what the numbers 18-105 mean. It basically stands for the zoom capacity of the lens.

Another whole different topic is prime lens. They are fixed lens, so you can't zoom with them. However, they are considered superior in terms of clarity. They are also lighter, cheaper, and easier to carry around.  Depending on what your primary subject(s) will be (family, kids, food, beach, portraits, etc), you need to pick out the right lens. Along with the D90 kit, I picked up a Nikkor 50mm 1.8 lens, especially for low light and food photography. This lens has a large DoF and so creates a wonderfully sharp subject with a blurred background, the ideal situation for food photos and portraits. You can see the first few pics taken with this lens in my Garlic Rolls Recipe page.

I researched a lot before deciding on what to buy. A few things I did (a lot) are:

- write to fellow food bloggers and friends who had a Nikon SLR, particularly a D90. Sig helped a lot with my questions and sent me Amazon links to make it super clear what exactly she was talking about.

- search for particular lens names and camera models on Flickr. You can see example shots taken with the lens you are interested in. This is immensely useful since it gives you an idea of what the lens is capable of. Of course, post-editing and expertise come into the picture too, but its still a useful thing to do. I pored a lot over the Nikkor 50mm night shots search results.

- research online of course. Some useful sites that explain concepts are DP Review and Ken Rockwell. You can also go through Flickr Forums. One conversation I found very useful is whether the 50mm lens does good landscape shots too. The lens are not ideal for landscape so its better not to buy that as the only one with your camera body.

- go to shops, hold the camera, try some test shots, see how it feels in your hands.

This post is getting too long so if there's any other info you'd like, you can leave a comment on the Facebook page or email me.

And btw, an SLR is totally totally TOTALLY worth the investment. Whatever people say, its just not possible to get the same quality with a P&S. If you are still undecided, I would say, Go.For.It ;)

Disclaimer: I am not an expert in this subject, just wanted to share my experiences during the hunt for the perfect SLR. I am super happy with the D90 so far. Also, I only considered Canon and Nikon as possibilities, doesn't mean you shouldn't look at Sony or Olympus or whatever. I just wasn't interested, that's all.

Food Photography in Portrait Mode

The first few rules you may keep hearing about taking food photographs is probably -

- Don't use a flash (yes, please don't)
- Use your macro setting
- Click in good, natural light

These are all good and valid points, definitely. But your camera, even if its a point and shoot, has a lot more capability than you give it credit for.

So here's an experiment I did clicking with my macro setting off *gasp* and in the portrait setting. You should still leave your flash off and click in good, natural light because we are not going to break all the rules in one go. That will just be rude.

A bit about the portrait mode that's in pretty much every camera out there. Its a very basic setting, but what does the portrait mode do to your camera?

The camera is going to try to isolate the subject, so it gives you a wide lens opening or a wide aperture to blur the background and give you little depth of field, thereby, isolating the subject so the subject stands out from the background, because the background is blurry and the subject is supposed to be clear. - Source

If you are wondering what the heck aperture and depth of field are, check out my article on Aperture, F-stops and DOF. Its confusing but very very useful.

Ok, now check this picture out.

Spinach Edited

I perched the plate with the spinach on the hand of my couch and used the treetops outside my window to give it a green, blurry backdrop. Well, that actually sounded like I devised a master plan to make my picture look good but it was all spontaneous. I actually rested the plate there thinking I will go get my white table but then decided to shoot it then and there.

How I took the shot:

I turned the camera setting to Portrait (marked by the image of a head on that dial on your camera). I was sitting a bit away from the plate that was on the couch hand. I zoomed in (quite a bit) until I felt I was framing the plate pretty well. The background got beautifully blurred because the Portrait setting was doing its job. That's it!

You can later edit the picture, crop it, sharpen it, etc. This technique will give you a good set of pictures to start with and choose from.

A few important things to remember:

- Make sure there's enough natural light to give the picture clarity.

- Place the camera atleast one feet away from the subject and zoom in. That's the key!

- Keep the camera as parallel to the subject as possible. So if you feel the backdrop is your living room and its too dirty, switch the plate around until you find a satisfactory background for the picture. If you try this in a top-down shot, it may not work.

- Use a tripod if you have one. I didn't for this shot but then I am stubborn and lazy sometimes but don't be like me. If you don't have a tripod, just use a stack of books, a shelf, a stool, anything that can give the base of your camera and your arms some support. When you zoom in, your camera becomes that much more sensitive (I will spare you the technical explanation for this) so using a tripod or some sort of support is very important.

Here's another shot I took using the same technique.

IMG_3245

So, that's it folks! So go ahead and experiment with your portrait settings and don't be afraid to turn your macro off and zoom right in until you like what you see. Click 20-30 pics and pick out your favourites once you upload.

I'd love to hear from you if you try this out. You can also check out my other articles on Food Photography for Food Bloggers.

Food Photography - Learn From Yourselves

I had this thought when I was in the shower. Or maybe it was when I was watering my lone curry leaf plant. Anyway, that's not important. What's important is, how can we all take better food pictures, right?

I am constantly looking at others' pictures and wondering how I can emulate the nice stuff in my clicks. How do I get that dark background that Sunita has achieved in the first 'wrap' picture in this post? Or how can I dream up lovely set ups like Meeta does? How do I make every day food look so gorgeous like Sala does? Or how do I take step by step pictures for every recipe of mine, like DK so patiently manages?

While its great that we always look and learn from others, probably the best place to start is from our own pictures. Sounds silly? Think again!

Here's one of the very first food pictures I took.
Looking at this now, I am thinking.. I really like that picture. Its true that the lighting could be better and I can find a better place now to click it without that part of the stove showing up on the right side and maybe, I should choose a fresher looking green chilly but really, I am too lazy now to actually do a set-up for any of my pictures.

But I like that I made the effort to cut up a lemon wedge, find a curly long green chilly, add a blob of butter (just behind the blog of kothamalli chutney). The colours are nice, they balance well and I would want to bite into that sandwich if I was hungry. Right?

Now, my pictures look like this. 


Or this. 


I am getting tired of the white background already! While the picture quality has definitely improved, its like I have lost my creativity in the process.

Each of us has a 'style'.  A technique that makes us stand out from the gazillion other food bloggers out there. Looking back, I feel like I have only worked on the quality of the pictures and never really nurtured the creative side. Its true, I may never do elaborate set ups or buy those studio lights any time soon but I can still take my pictures to the next level by going back, taking a look at what I was capable of and then building on it from there.
So dig into your archives, its similar to going back to looking at your college pics, getting amazed at how thin you were and then going on a crash diet. Only, for this exercise with your food pictures, you can still eat whatever you want :)

This is the post I had started typing on Monday and posted accidentally. Forgive the glitch!

Food Photography Basics - Choosing Your White Table

I'm kidding. This post doesn't have much to do with food photography as such. I have to revive that series, I know I know.

But meanwhile, I am going to answer the question many of you have asked me through comments and emails.

"What's that white background that you use in most of your pictures?"

And today, I present to you.. TADAAA..

OOPS! Oh wait! That's my extremely cluttered, not-white-at-all coffee table.

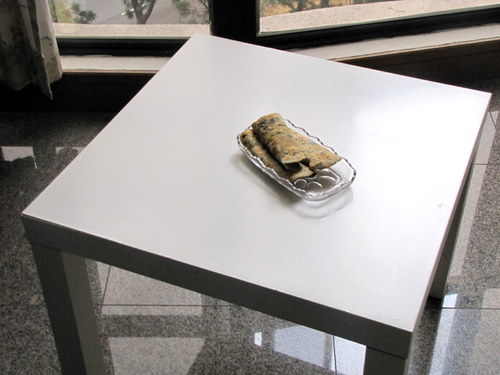
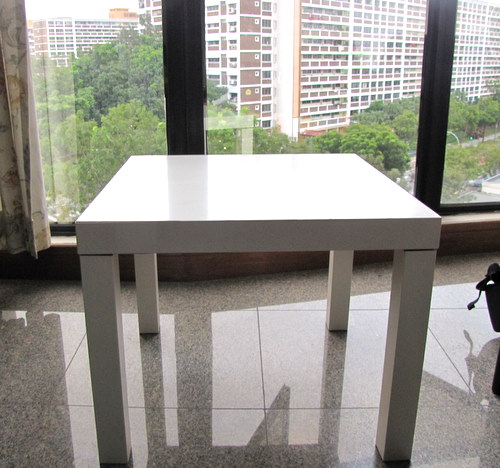
Here's my white table I use for food pics.


He may look a bit confused but that's because he is not used to being photographed without food on him, you see.

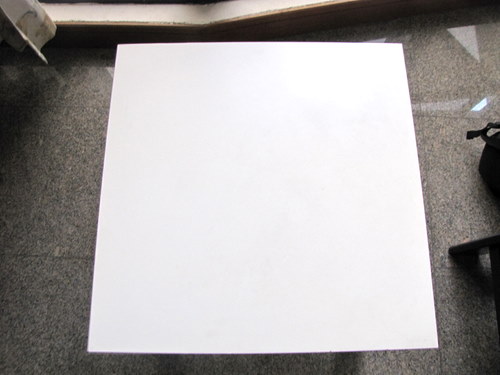
Its very convenient to have a hard, white base that easily cleanable and portable. The table weighs less than 1kg 2kg usual tables and you can bring it to any part of your house where there's enough natural light for your pics.

See what I mean? A white base reflects light well and enhances the picture when you later edit using Picasa or any other software. I love using a plain white base most times partly because I am too lazy to do an elaborate set up but mostly because I love the simplicity. Try it!


The table is from Ikea. Its a Lack Table that I bought for 20 SGD. I tried searching the Ikea website for the link but looks like they have stopped this product, maybe temporarily.

Moral of the story: grab the white table the moment you see it because by the time you consider it and decide, it may be too late.

Happy clicking on white!

** Coming up: a post dedicated to my oven which is another topic I get the most emails on. Looks like nobody is really reading my recipes eh? Ok, kidding :D

Adding Banners To Food Pics Using Powerpoint

Sometimes you feel your pictures need some zing, something extra to take it to the next level. The answer may not always be picasa, or photoshop or other editing software. It could even be Powerpoint!

When I started off food blogging, I used powerpoint to add watermarks, borders and banners to my pictures. It was simple and I used powerpoint so much at work that it didn't seem like much of an extra effort to me. As soon as Picasa came up with the feature to add text to pictures, I slowly moved away from powerpoint.

But, I still use it to jazz up my pics a bit, add a border and make it look a bit different, maybe like a cookbook cover which is what a lot of you said after seeing this picture of mine :)

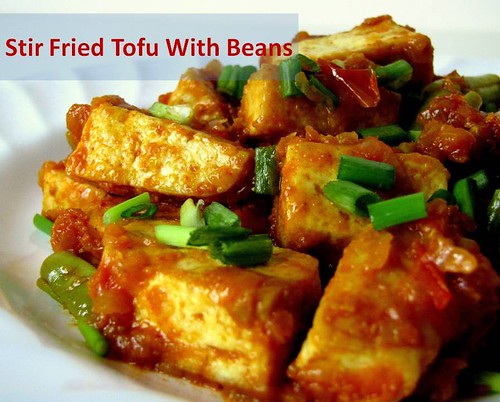
So let's see how we can make this picture..

.. look like this in a few easy steps.


I recently upgraded to MS Office 2007 so this tutorial is using 2007. That really shouldn't be a problem because all the features we are using to do this is very much available in 2003 and older versions too. The menu options may be different so I have tried to highlight those here. I am doing this from memory so please bear with me :)

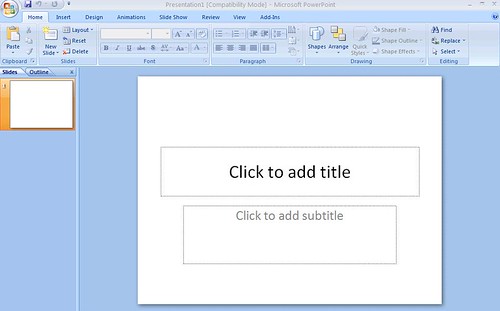
1. Ok so let's start with opening Powerpoint (Ppt).


Ppt 2007 users click on the ppt icon from your start menu.

Ppt 2003 users.. err.. do the same :D (ok, lame joke)

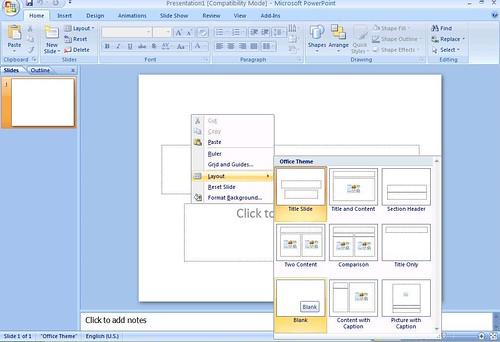
2. I usually like to work on a plain slide but that's just me. This is not a necessary step but just nice-to-do. So if you'd like to work on a plain slide,

Right click on the slide --> Layouts --> Choose blank layout

For 2003 users, the layouts will open on the right hand side of the page.


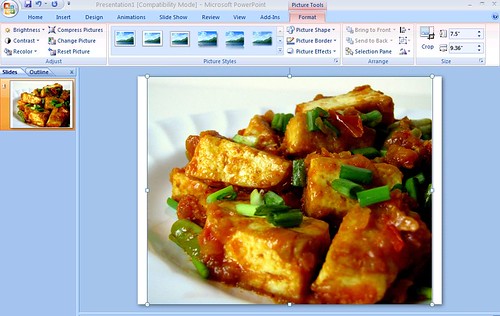
3. Next, we need to open the picture we want to edit. For that, click on,

Insert --> Picture --> and browse for the picture in your computer.

For 2003 users, the options are the same except that you would need to specify 'picture from file' before you can browse and add it on.


So here's our picture, ready to be worked on. Notice the extra white spaces from the slide on both sides? Don't let that bother you too much, we are going to get rid of it at the end.

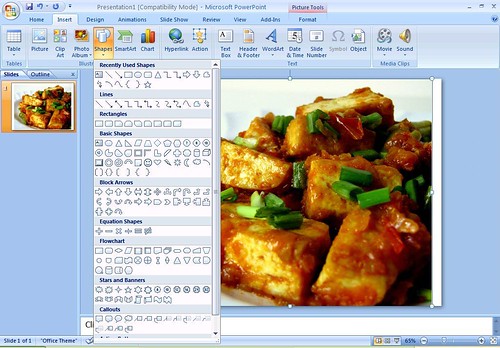
4. Next, we need to add the basic rectangular banner on which we can type our text. For that, go to,

Insert --> Shapes --> and pick the rectangle from the list


For 2003 users, you should be looking for basic shapes. You will find the rectangle in a toolbar at the bottom of your slide. Click that and we are good to go.

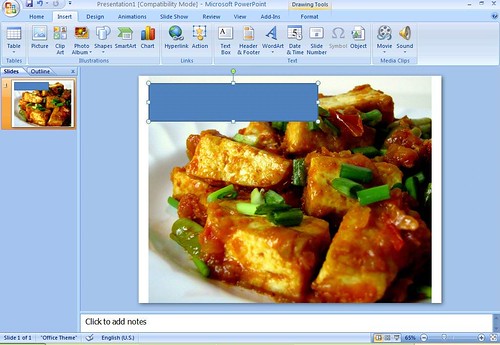
5. Drag and draw the rectangle to the desired size.


You can decide to put it in the top centered, to one side like I have done, at the bottom to the right. This is where you can let your imagination run wild and come up with unique ways to make your pics stand out.

6. We have the basic shape in place, so now its time for the fun part! The first and most important thing is to adjust the transparency of this box so that it doesn't look like its blocking out a part of the picture.

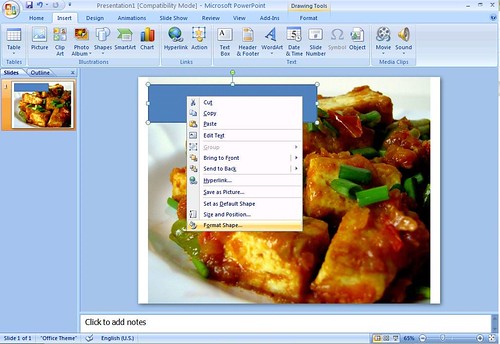
To adjust transparency,

Right click on picture --> Format shape


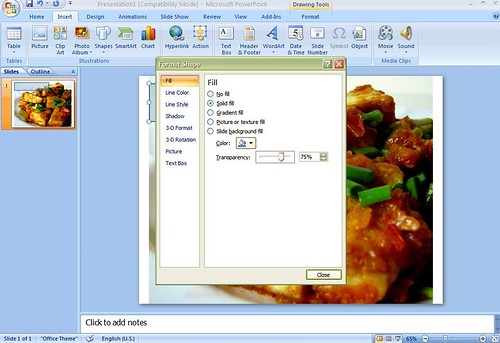
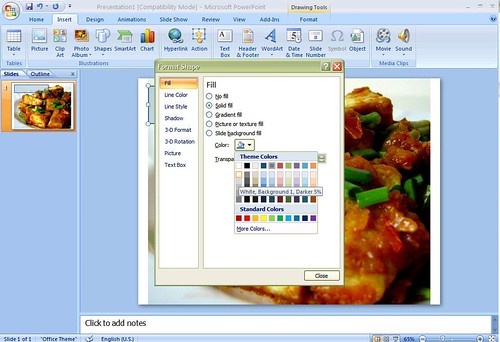
You'll see this box pop up:


Choose fill from the left hand side and move the transparency slider to the right. I have chosen 75% here.

You can also change the colour of the box (just above transparency slider) to match your picture (shown below)


2003 users, right click on the picture. If I remember correctly, you should see an option to 'Format Picture'. If not, use the Format menu option and choose picture.

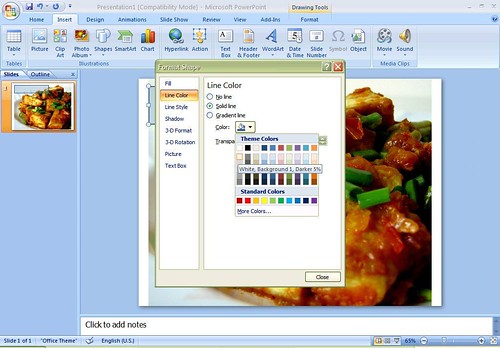
7. Next step that's quite small but significant is to change the outline properties of the box. Ppt 2007 automatically chooses a blue box as we saw above and changing the fill colour and transparency still leaves the outline of the box in a dark blue.

To change this, choose Line Color from the 'Format Shape' box as below.

You can either pick a different colour that matches the box colour above ..


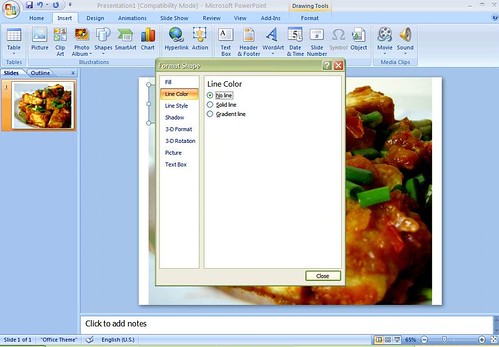
.. or choose 'No Line' so that the box just becomes seamless (the outline matches the colour of the box). This is the option I always choose.


Here is our what we are left with. I still remember how excited I was the first time I did this!


8. To add text, just click on the box and start typing. Ppt 2007 defaults the text to a dull white.


The options to edit the font are endless. Choose a font and colour you feel complements your picture the best.

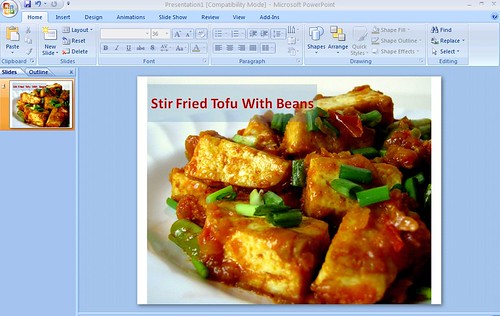
I chose a boring maroon and an even more boring font because I was a bit tired of taking screenshots. Forgive me.


9. We are almost done! Let's save the file. Since this is a powerpoint presentation currently, you will need to save it as a picture. For this,


Click on the windows icon in the top left corner and choose Save As --> Name your file and from the drop down below it, choose JPEG format.

For 2003, its File --> Save As..

Voila! Done!!

10. But wait, your picture has that white space on both sides, right? No worries.

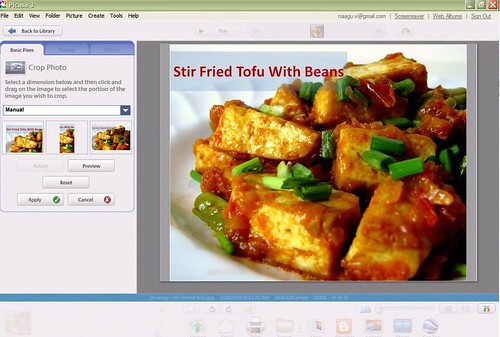
Open it in Picasa.. (notice the white bars on both sides?)


.. and crop it off!!


Go to File --> Save as and save your cropped file.

You will feel really happy when you open your saved file and see this! Especially if you are doing this for the first time, trust me!


I know this sounds like a lot of steps but if you know your way around in powerpoint, its really not hard.

Please let me know your thoughts on tutorial and if I have made any silly mistakes in the 2003 instructions. I would appreciate it if any of you who have Ppt 2003 can let me know the exact options to do the steps.

Some of the screenshots may be fuzzy because I used the age-old print screen option. I do funny things when I am tired or lazy or cranky.

For previous posts in the Food Photography Basics series, please click HERE.

As always, if you try this out, do drop a line in the comments and I would love to see it!

Angles For Your Food Pictures - Experiment!

I have been lazy and unwell over the weekend. Well, mostly Sunday. So meals over this weekend were mostly comfort food, like dal chawal - the everyday yummy yellow dal recipe that I use and use and use again atleast once a week. I also made pepper rasam, lots of it, and it was so good for my sore throat.

After making the yellow dal for our dal chawal on Sunday, I realized that I have never posted the recipe here. In fact, quite a few of my friends, especially those who are abroad, have emailed me asking for basic yellow dal recipe or dal-chawal recipe. It just seemed too simple to post here but I now I know better.

I don't know why I went yada-yada over the recipe so much because I am not going to post it now :D I just wanted to share the pictures I took of the dish and the various angles I tried.

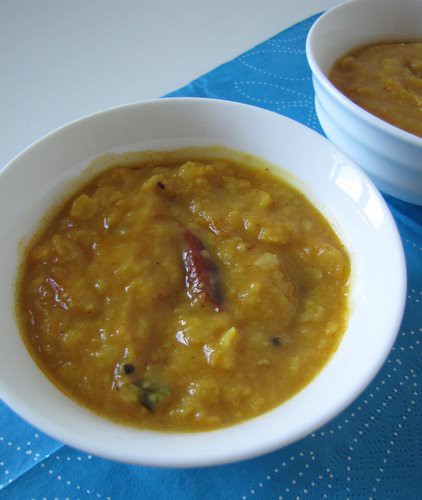
Ok so, first, I transferred the dal to two of my white bowls. I was a bit eager to use my napkin papers from Ikea so I took out the bright blue ones thinking they would make a good combination with the yellow of the dal.

Blegh. How boring is that? Really!


*Rotates the napkin to try a different angle*


still, very meh. Whatever. The dal looks dull in this one. Not excited at all.

Looks like the napkin has to go. Sigh..


Its definitely an improvement but what's that bright shot of light from the top left doing in the picture?

*Walks over and closes the window*

*tap tap tap*

Two bowls of dal feels like an overkill. After all its a simple dish so why not go for a simple look?

Hmmm..

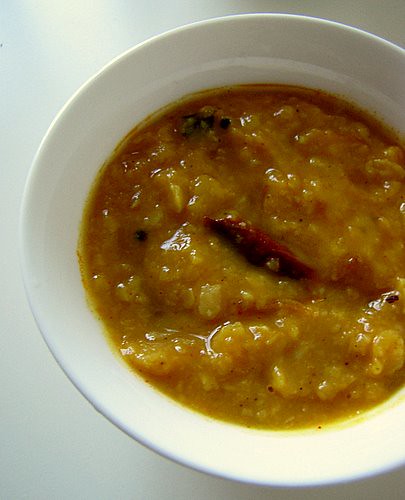
Just one bowl, overhead shot, no colours or fancy napkins, nice and comforting, just like the dal. What say?


Hmm.. naah! Too boring. I have done a zillion shots like this, I need more in the picture. Something's missing!

Last chance with both bowls. Different angle this time and maybe I can blur off the bowl in the background later.


YUCK! No! Two bowls is not an option. Discard idea. Dis-caaaaaaard!!!

*tap tap tap*

Ah! The messy look! I haven't experimented much with this. How about that? Messy dal! Everyday yellow dal that's also messy!

Like so.


Hmmm.. not bad. I do like it but don't feel like this is it. Since I tried the messy look, how about also giving the 'holier-than-though' look a shot?

*Quickly licks spoon*

Yumm. Good thing I have another bowl of dal ready.

*Switches bowls, messy for non-messy*


Ah.. that's nice too. Simple and neat and nice. A little unhappy with the glaring light on the spoon. Quite pleased with the 'licking job' though ;)

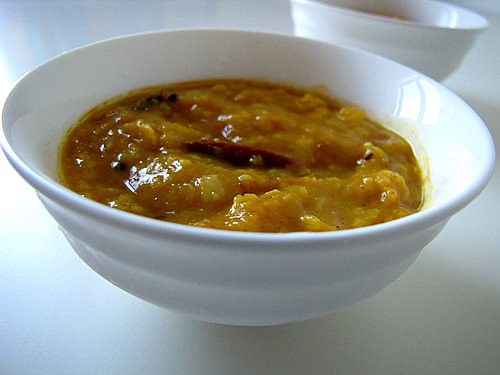
Ok hold on! What about the 'bowl-in-bowl' look? Ahh! That could look good too.

*Rushes to clean the bowl that featured in the messy-look picture*

*Click*


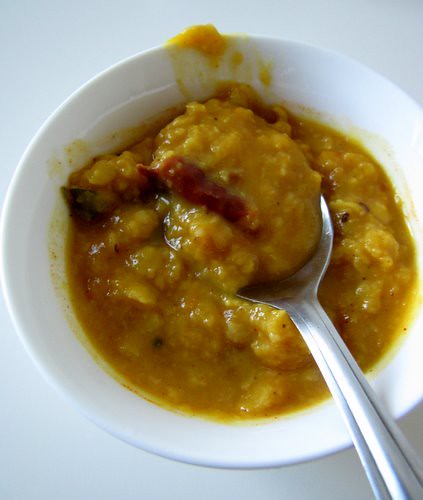
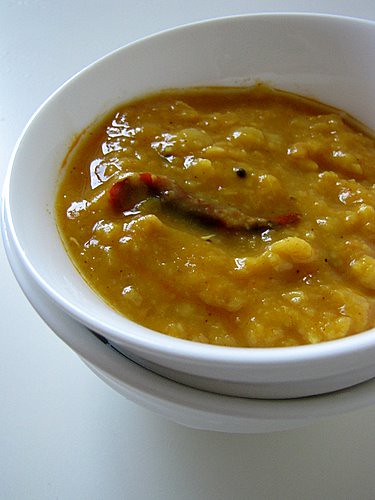
Oooh, nice. Quite classy. The shadows are not too bad. Should I fit in the spoon there? Hmm.. nah! This looks fine. This could work.

*Smiles*

But wait, what about the same thing on my wooden sticks coaster?


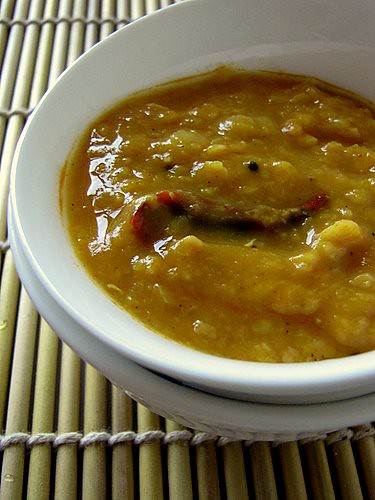
Even better! This one wins. Congrats buddy, you get to go on the post. And maybe even to Click - Wood if nothing else works. This would be a lame entry but what the heck! Am feeling adventurous ;)

Which pic(s) did you like, if any?

Do you try out different angles, backgrounds and set ups too? If not, what's stopping you? Go on, play!
I also have one exercise for you guys. Here's what you need to do:

1. I want you all to pick 5 of your most favourite food blogs, especially the ones you admire for their photography. Make sure you pick food blogs and not food photography blogs.

2. Go to their oldest set of posts, using their archives link or something. The longer they have been blogging, the better this would work.

3. Look at their first few pictures and be amazed. Be prepared for some serious jaw-drops, in most cases.

Moral of the exercise: We all start somewhere. Its okay to take so-so pics initially as long as you have the interest and the determination to learn. Some take their pics and recipes and templates to the next level in a few weeks' time, some take months and a few, even years. There is no right time or too much time, its all decided by you.
PS: If any of you take a look at my old pics, you'd be quite amazed too :) Not that I am spectacular now, but trust me, you will see a lot of difference!

PPS: I need some ideas for posts in the photography series. Otherwise you are going to be bombarded with posts like this one. Consider yourselves warned!

Click HERE for the initial posts in the series.